Writing Your Content
The Eduskript editor is split-screen: markdown source on the left, live preview on the right. As you type, the preview updates in real time. Both panes scroll-sync — scroll the source, the preview follows, and vice versa.
The editor at a glance
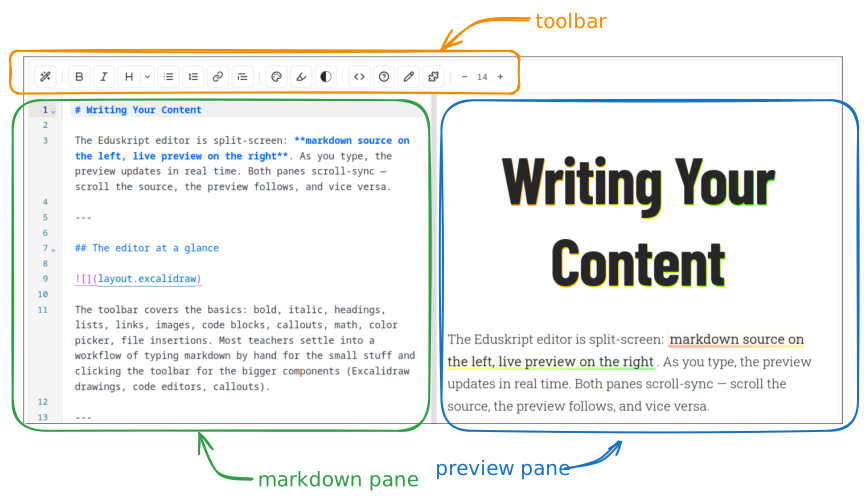 Editor layout: source on the left, live preview on the right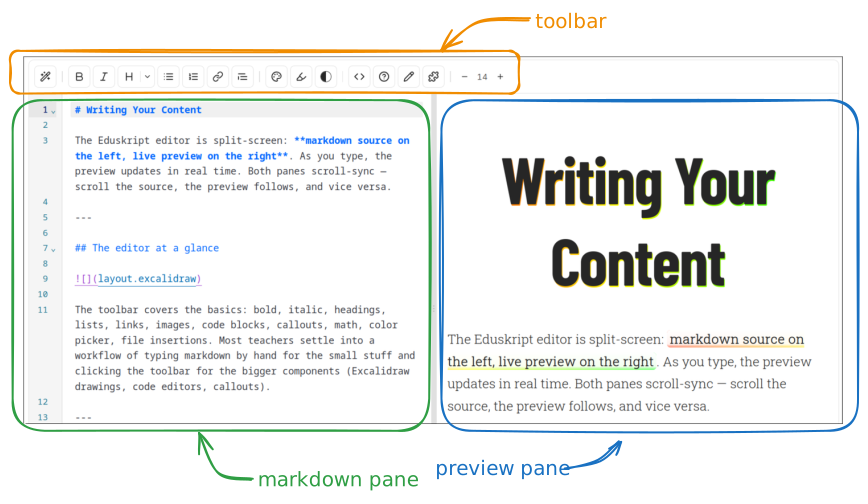
The toolbar covers the basics: bold, italic, headings, lists, links, images, code blocks, callouts, math, color picker, file insertions. Most teachers settle into a workflow of typing markdown by hand for the small stuff and clicking the toolbar for the bigger components (Excalidraw drawings, code editors, callouts).
Standard markdown — what works as expected
Eduskript uses CommonMark + GitHub-Flavored Markdown as a base, then adds custom extensions on top.
| Syntax | Result |
|---|---|
# Heading 1 | top-level heading |
## Heading 2 | second-level heading |
**bold** | bold |
*italic* | italic |
***both*** | both |
`inline code` | inline code |
~~strikethrough~~ | |
==highlight== | highlighted text |
[link text](https://example.com) | hyperlink |
 | image (uploaded file) |
> blockquote | block-quoted text |
- list item | unordered list |
1. numbered | ordered list |
- [ ] task | task list with checkbox |
| Pipe tables | full GFM table support |
--- | horizontal rule |
Triple backticks ``` | code block |
Headings are special — they auto-generate the page outline (table of contents in the right sidebar) and become anchor links you can share directly.
Hover toolbars in the preview
Hover your mouse over rendered content in the preview pane and contextual toolbars appear:
- Hover an image → resize handles, alignment buttons, alt-text editor
- Hover a code editor → "Insert above / below" arrows, edit settings (id, language, db)
- Hover an Excalidraw drawing → "Open in editor" to modify
- Hover a callout → change the type, toggle collapsed/expanded
- Hover a video → poster picker, autoplay/loop toggles
This is the fastest way to tweak a component once it's in the page — no need to memorize attribute syntax.
The top-bar features
| Button | What it does |
|---|---|
| Save | Save your draft (Ctrl+S works too). Auto-saved every few seconds. |
| Preview | Open the rendered page in a new tab — see exactly what students see. Works for drafts. |
| Publish | Toggle the page between draft / published / unlisted. |
| Manage | Drawer with the skript's settings, page list, file/video panels. |
| Files | File panel for uploads (images, PDFs, databases, code). |
| Videos | Video panel for Mux-hosted video uploads. |
| AI ✨ | AI Edit chat — the leftmost toolbar button. Describe a change, review it as an inline diff card, Ask or Auto. See below. |
| Fullscreen | Hide everything else; just editor + preview. |
AI Edit chat
Click the wand icon (✨) — the leftmost button in the editor toolbar — to open AI Edit. It's a real conversation, not a one-shot command: describe what you want, keep talking to refine it, and it remembers what you already asked for in that session.
"Add a callout at the top with the learning goals."
"Translate this page to French, keeping all code blocks unchanged."
"Add a
python-checkto the FizzBuzz exercise that tests n=15, 30, and 100."
Each proposed edit shows up as an inline card in the chat: a short lead-in sentence explaining what it changed, followed by a diff.
Ask vs. Auto
A toggle in the chat controls how changes land on the page:
- Ask — review one change at a time. Each card gets Accept, Reject, or Respond (give feedback and have it try again). Nothing touches your page until you accept.
- Auto — the AI writes each change straight to the page as it proposes it. Reject on a card undoes that specific change.
A Stop button aborts generation mid-stream if it's heading the wrong way.
The chat resets, your edits don'tClosing the tab or switching to another page resets the conversation — you lose the back-and-forth. Anything already accepted (Ask mode) or applied (Auto mode) stays on the page; it's saved like any other edit.
Availability
AI Edit chat is a paid feature — locked for free accounts.
Personal and org-wide system prompts
Set a personal voice for the AI in Account settings → AI system prompt — e.g. "Always write in German (Sie-form for students)," or "Prefer concise explanations over long preamble." Organization owners can set an org-wide system prompt in Organization settings to enforce a consistent voice across every teacher in the org.
Two ways to write the same thing
For most things, you can use markdown OR HTML. Markdown is shorter; HTML lets you set extra attributes.

<image src="fish.jpg" alt="A school of fish" width="50%" align="right" wrap />
Both render an image. The first uses the file's full width. The second floats the image right at 50% width with text wrapping around it.
The same applies to code editors, videos, callouts, plugins — pick whichever feels natural for the case at hand.
Custom HTML rulesCustom Eduskript components must be lowercase with string-quoted attribute values. No JSX, no PascalCase.
- ✅
<code-editor data-language="python">- ❌
<CodeEditor language="python">(PascalCase)- ❌
<code-editor data-id={pageId}>(JSX expression)Most modern browsers tolerate uppercase tags but Eduskript's renderer normalizes everything to lowercase before parsing.
Front pages
Besides ordinary pages, you can write a front page for your public site, for a collection, or for a skript — a custom landing page shown before a visitor reaches the page list. It's the same split-pane editor, same markdown and components; it just renders at the root (/<slug>, a collection's entry, or a skript's entry) instead of at a specific page slug.
Use a front page as the "front door": an introduction, a syllabus, a picture of the class — whatever should greet a visitor first, before they dive into individual pages.
Custom CSS
For formatting the built-in components don't cover, drop a scoped <style> block directly into page content:
<style>
.callout-highlight { border-left: 4px solid orange; padding-left: 1rem; }
</style>

<div class="callout-highlight">A custom-styled box.</div>
Styles are scoped to the page — they won't leak out and affect other pages. Inline style="..." works the same way on any element:
<p style="text-align: center; font-style: italic;">Centered, italic text.</p>
Reach for custom CSS when you've outgrown callouts, flex layouts, and the color palette — it's an escape hatch, not the default tool.
Drafts auto-save, and version history
Every page change is saved automatically. You can also:
- Manually create a version — adds a labeled snapshot to the version history
- Restore an older version — picks an old snapshot and replaces the current draft
- Auto-versions every 100 keystrokes — accidental deletes are recoverable
Find version history in the page editor's overflow menu (⋯).
Mobile and tablet editing
The editor is responsive. On a phone, the preview collapses into a tab — you swipe between source and preview. Touch-friendly toolbar with bigger hit targets. Drawing on the page (annotations) works with finger or stylus.
That said, this is a tool for teachers — most of the heavy lifting happens at a desk. The mobile editor is for last-minute tweaks, not full lesson authoring.
Drawing straight lines and shapes
Freehand is fine for notes, less so for axes, tangents and boxes. Two ways to get clean geometry, both available to anyone drawing on a page — teacher or student, mouse, stylus or finger:
| Hold Shift while drawing | The stroke becomes a straight line from where you started to where the pointer is now. Let go of Shift and you are back to freehand. |
| Shift + Alt | Same, but the angle snaps to 15° steps — horizontal, vertical and 45° come out exact. |
| Hold still for half a second, then lift | The stroke is recognised and redrawn: a roughly straight one becomes a line, a closed round one a circle, a boxy one a rectangle. Anything that doesn't clearly fit is left exactly as drawn. |
The result is an ordinary stroke — the eraser, undo, sharing with a class and the AI feedback all treat it like anything else you draw.
Straight lines stay editable. With no pen or eraser selected, hover a straight line: a handle appears at each end. Drag a handle to move that end, drag the line itself to move the whole thing. Circles, rectangles and freehand strokes are not editable this way — for those, erase and redraw.
Productive habits
Use the toolbar for what's hard to typeCode editors, Excalidraw drawings, callouts, and color spans have just enough syntax that the toolbar saves time. For prose, headings, lists, and emphasis, type by hand — it's faster.
Headings are your outlineUse
##for major sections and###for sub-sections. Students see them in the right-side outline, can click to jump, and can share anchor links.
Preview on a real deviceClick Preview, copy the URL, open it on your phone or a colleague's laptop. Catches font-size and layout issues that only show up at certain widths.